App Installation
Development Environment Setup
Before installing the Car2Go Pro app, you need to set up your development environment. Follow these steps carefully:
1. Flutter Installation
- Windows
- macOS
- Linux
-
Download Flutter SDK:
- Visit Flutter Official Website
- Download the latest Flutter SDK zip file
- Extract to a location (e.g.,
C:\flutter) - Add Flutter to PATH:
- Search for "Environment Variables"
- Under "System Variables", edit "Path"
- Add new entry:
C:\flutter\bin
-
Install Git:
- Download from Git for Windows
- Use default installation options
-
Install Homebrew:
/bin/bash -c "$(curl -fsSL https://raw.githubusercontent.com/Homebrew/install/master/install.sh)" -
Install Flutter:
brew install --cask flutter -
Install Xcode:
- Download from Mac App Store
- Install Xcode Command Line Tools:
xcode-select --install -
Accept Xcode License:
sudo xcodebuild -license
-
Install Snap (if not installed):
# For Ubuntu/Debian
sudo apt update
sudo apt install snapd
sudo snap install core

# For Fedora
sudo dnf install snapd
sudo ln -s /var/lib/snapd/snap /snap

# For Arch Linux
git clone https://aur.archlinux.org/snapd.git
cd snapd
makepkg -si
sudo systemctl enable --now snapd.socket -
Install Flutter using Snap:
sudo snap install flutter --classic -
Install Required Packages:
sudo apt-get update
sudo apt-get install -y \
    clang \
    cmake \
    ninja-build \
    pkg-config \
    libgtk-3-dev \
    liblzma-dev
After installing snap, you might need to log out and log back in for the system to fully recognize snap commands.
2. Android Studio Installation
- Windows
- macOS
- Linux
- Download Android Studio from Android Developer Website
- Run the installer (.exe file)
- Select all components during installation
- Complete the installation
- Download Android Studio for Mac
- Move the .dmg file to Applications folder
- Install Java Development Kit:
brew install --cask adoptopenjdk - Open Android Studio and complete setup
-
Download Android Studio:
sudo snap install android-studio --classicOr using Ubuntu Make:
sudo add-apt-repository ppa:ubuntu-desktop/ubuntu-make
sudo apt-get update
sudo apt-get install ubuntu-make
umake android
3. Android SDK Setup
- Windows
- macOS
- Linux
-
Open Android Studio
-
Go to Tools → SDK Manager
-
In SDK Manager, you'll see several tabs. Install the following components:
"SDK Platforms" tab:
- Android 12.0 (API Level 31)
- Android 11.0 (API Level 30) [Optional]
"SDK Tools" tab:
- Android SDK Build-Tools
- Android SDK Command-line Tools
- Android SDK Platform-Tools
- Android Emulator
- Android SDK Tools
tip- Click "Show Package Details" checkbox at bottom right to see all versions
- For Build-Tools, select the latest version (e.g., 33.0.0)
- Total download size might be around 1-2 GB
-
Click "Apply" and accept the license agreements
You can find your Android SDK location at:
- Windows:
C:\Users\YourUsername\AppData\Local\Android\Sdk - macOS:
~/Library/Android/sdk - Linux:
~/Android/Sdk
- Same steps as Windows
- For iOS development:
- Open Xcode
- Go to Xcode → Open Developer Tool → Simulator
- Or run:
open -a Simulator
- Same steps as Windows
- Additional setup for Linux:
# Install KVM for better performance
sudo apt-get install qemu-kvm libvirt-daemon-system libvirt-clients bridge-utils
sudo adduser $USER kvm
sudo chown $USER /dev/kvm
4. Flutter Setup Verification
- Windows
- macOS
- Linux
- Open Command Prompt
- Run:
flutter doctor
flutter doctor --android-licenses
- Open Terminal
- Run:
flutter doctor
flutter doctor --android-licenses

# For iOS development
sudo xcode-select --switch /Applications/Xcode.app/Contents/Developer
sudo xcodebuild -runFirstLaunch
- Open Terminal
- Run:
flutter doctor
flutter doctor --android-licenses
5. IDE Setup
- Android Studio
- VS Code
-
Install Flutter Plugin:
- Open Android Studio
- Go to
File → Settings → Plugins - Search for "Flutter"
- Click Install and restart Android Studio
-
Open Project:
- Click
File → Open - Navigate to your project folder
- Click
OK - Wait for project indexing to complete
- Click
-
Configure Flutter SDK:
- Go to
File → Settings → Languages & Frameworks → Flutter - Set Flutter SDK path to where you installed Flutter
- Click
OK
- Go to
-
Configure Android SDK:
- Go to
File → Settings → Appearance & Behavior → System Settings → Android SDK - Ensure proper Android SDK is installed
- Click
OK
- Go to
-
Install Required Extensions:
- Open VS Code
- Go to Extensions (Ctrl+Shift+X)
- Install these extensions:
- Flutter (by Dart-Code)
- Dart (by Dart-Code)
-
Open Project:
- Go to
File → Open Folder - Select your project folder
- Click
Select Folder
- Go to
-
Configure Flutter:
Open VS Code Terminal in any of these ways:
- Press
Ctrl + `(backtick key, usually below Esc) - Press
Ctrl + J - Go to
View → Terminal - Click Terminal menu at top and select
New Terminal
tipIf terminal doesn't show up:
- Press
Ctrl + Shift + P - Type "Toggle Terminal"
- Press Enter
After opening terminal, run these commands:
flutter doctor
flutter pub get- Fix any issues shown by
flutter doctor
tipCommon
flutter doctorfixes:- Accept Android licenses:
flutter doctor --android-licenses - Update Flutter:
flutter upgrade - Update path: Add Flutter bin directory to system PATH
- Press
-
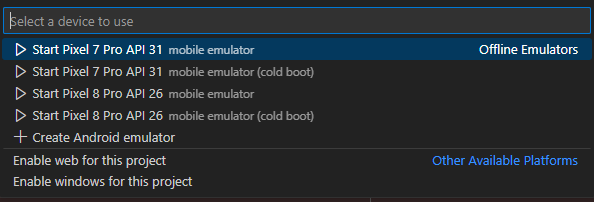
Setup Device:
- Click on "No Device" in bottom right corner
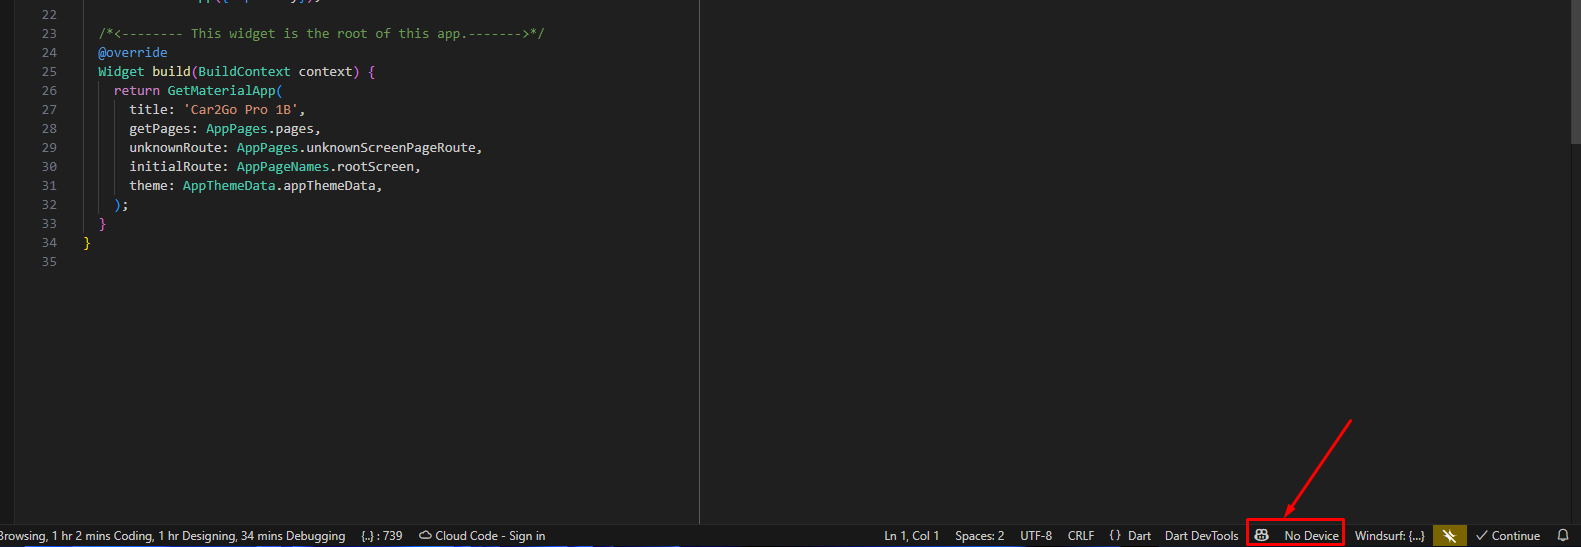
- Select your emulator or connected device
 tip
tipIf you don't see any devices:
- Make sure Android Emulator is running
- For physical device, enable USB debugging
- Run
flutter devicesin terminal to check available devices
VS Code Shortcuts for Flutter:
Ctrl + F5: Run without debuggingF5: Run with debuggingCtrl + Shift + P: Command palette for Flutter commands
6. Create Android Virtual Device (AVD)
- Windows
- macOS
- Linux
- Open Android Studio
- Click Tools → Device Manager
- Create Virtual Device
- Select Pixel 4 (or any other device)
- Download system image (API 31)
- Complete AVD creation
- Same steps as Windows
- For iOS Simulator:
- Open Xcode
- Go to Xcode → Open Developer Tool → Simulator
- Or run:
open -a Simulator
- Same steps as Windows
- Additional setup for Linux:
# Install KVM for better performance
sudo apt-get install qemu-kvm libvirt-daemon-system libvirt-clients bridge-utils
sudo adduser $USER kvm
sudo chown $USER /dev/kvm
After completing these steps, you're ready to proceed with the Car2Go Pro app installation.
Note: Make sure you have at least 8GB RAM and 10GB free disk space for smooth development experience
App Installation Process
Note : This installation process applies for both user and driver app
Initial Project Setup
-
Extract the project:
- Unzip the downloaded project file to your desired location
- Open Command Prompt or Terminal
- Navigate to the extracted project directory using
cd path/to/project
-
Clean and Setup Project:
# Check Flutter version and channel
flutter --version

# Run flutter doctor to ensure everything is ready
flutter doctor

# Clean the project to ensure fresh start
flutter clean

# Get all dependencies
flutter pub get     # Install dependencies
-
If
flutter pub getfails:# Remove existing packages
rm -rf pubspec.lock
rm -rf .packages
flutter clean
flutter pub get -
If Android Studio doesn't recognize Flutter:
flutter config --android-studio-dir="<path to Android Studio>" -
If PATH is not working:
- Windows: Restart Command Prompt after PATH changes
- Linux/macOS: Run
source ~/.bashrcorsource ~/.zshrc
-
For permission issues on Linux:
sudo chown -R $USER:$USER /path/to/flutter
-
Check Project Structure:
- Ensure all folders are properly extracted
- Verify the following folders exist:
/android/ios/lib/assets
-
IDE Setup:
- Open the project in Android Studio or VS Code
- Wait for IDE to complete initial setup and indexing
- Ensure no red underlines or error indicators in the project
If you face any dependency issues, try the following:
- Run
flutter cleanand then runflutter pub getagain
Configuration Files Setup
- App Settings
- Android Setup
- iPhone Setup
Android Setup Steps
-
Google Maps Setup:
- Find the file:
android/local.properties - Open the file
- Add this line (replace with your actual key):
secret.googleMapKey=<GOOGLE-MAPS-API-KEY>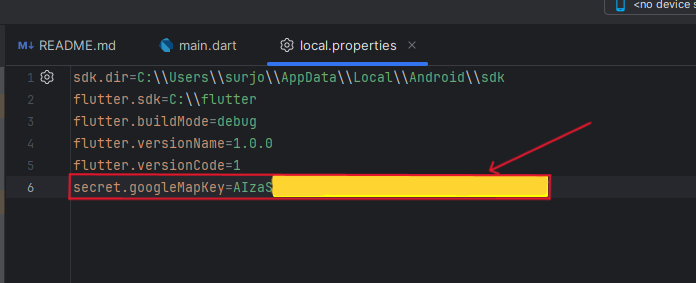
- Find the file:
-
App Signing Setup (for Play Store):
- Create
key.propertiesfile inandroidfolder - Create or copy
upload-keystore.jkstoandroid/appfolder - Keep these files safe - you need them to update your app later!
- Create
-
Firebase Setup:
- Get
google-services.jsonfrom Firebase website - Put it in
android/appfolder - This is needed for login and notifications
- Get
- Can't find a file? Use Android Studio's file explorer
- Files not showing? Click the "Show Hidden Files" option
- Getting errors? Make sure file names are exactly as shown
iPhone Setup Steps
-
Google Maps Setup:
- Open
ios/Runner/AppDelegate.swift - Find the Google Maps section
- Add your key like this:
GMSServices.provideAPIKey("<GOOGLE-MAPS-API-KEY>")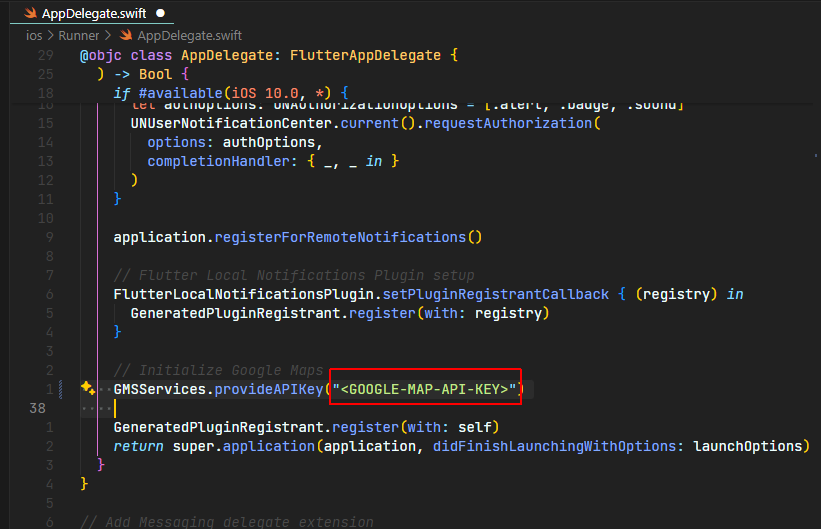
- Open
-
Firebase Setup:
- Download
GoogleService-Info.plistfrom Firebase - Put it in
ios/Runnerfolder - This file is needed for the app to work
- Download
- Need Xcode to develop for iPhone
- Must use a Mac computer
- Test on iPhone Simulator first
App Settings Setup
-
Backend API Setup:
- Open
lib/utils/constants/app-constants.dart - Find the API URL section
- Change it to your server address:
static const String API_BASE_URL = "https://your-backend-url.com";
- Open
-
Maps Setup in App:
- Open
lib/utils/constants/app-secret.dart - Add your Google Maps key:
static const String GOOGLE_MAPS_API_KEY = "<GOOGLE-MAPS-API-KEY>";
- Open
- Never share your API keys with anyone
- Don't put keys on GitHub or other public places
- Always use HTTPS for API URLs
Running in Development Mode
After completing all the setup steps above, you can run the project in development mode. This mode is ideal for testing and development as it provides hot reload capabilities and debugging tools.
-
Connect a Device:
- Connect a physical device via USB with USB debugging enabled
- Or start an Android/iOS emulator
-
Open Terminal in Project Root:
# Verify connected devices
flutter devices

# List emulators
flutter emulators

# Launch specific emulator (replace emulator-id)
flutter emulators --launch <emulator-id>

# Run on specific device when multiple connected
flutter run -d <device-id or emulator-id>

# Run the app in debug mode
flutter run -
Development Mode Features in Terminal:
- Press 'r' in terminal to hot reload
- Press 'R' for hot restart
- Press 'q' to quit
- Press 'h' to display all commands
-
Enable USB debugging on your Android device:
- Go to Settings → About Phone
- Tap Build Number 7 times to enable Developer Options
- Go back to Settings → Developer Options
- Enable USB Debugging
-
For iPhone development:
- Open Xcode and sign in with Apple ID
- Trust your development certificate
- Trust your device in Xcode
- VS Code
- Android Studio
VS Code Debug Steps:
a. Select Device:
- Look at the bottom status bar
- Click on "No Device" or device name
- Select your emulator or connected device
b. Start Debugging:
- Method 1: Click the "Run and Debug" icon in the left sidebar (or press
Ctrl+Shift+D) - Method 2: Press
F5key - Method 3: Open command palette (
Ctrl+Shift+P), type "Debug: Start Debugging"
c. Debug Controls:
- Use the debug toolbar at the top:
- ▶️ Continue/Pause
- ⤵️ Step Over
- ⬇️ Step Into
- ⬆️ Step Out
- 🔄 Hot Reload
- 🔁 Hot Restart
- ⏹️ Stop
- Set breakpoints by clicking left of line numbers
- View variables in the Debug sidebar
- Use Debug Console for logging
- Install "Dart Debug Extension Pack" for enhanced debugging
Android Studio Debug Steps:
a. Select Device:
- Click the device dropdown in the toolbar
- Choose your emulator or connected device
- If no devices, click "Open Android Emulator"
b. Start Debugging:
- Method 1: Click the green "Debug" button (🐞) in the toolbar
- Method 2: Select
Run → Debug 'main.dart' - Method 3: Press
Shift+F9
c. Debug Controls:
- Use the debug toolbar:
- ⏯️ Resume Program
- ⏸️ Pause Program
- ⏹️ Stop
- 🔄 Hot Reload (
Ctrl+\\or⌘+\\) - 🔁 Hot Restart (
Ctrl+Shift+\\or⌘+Shift+\\)
d. Debug Windows:
- Variables: View and modify variable values
- Breakpoints: Manage all breakpoints
- Logcat: View Android device logs
- Flutter Performance: Monitor app performance
- Double-click line numbers to set breakpoints
- Use Logcat to view system logs
- Enable "Show Heap Updates" to monitor memory
- Use Flutter Inspector for widget debugging
-
Common Development Commands:
# Clean and rebuild
flutter clean
flutter pub get
flutter run

# Check for issues
flutter analyze

# Run tests if available
flutter test -
Debugging Tools:
- Use print statements for basic logging:
print('Debug: ${variable.toString()}'); - Use IDE debugging features (breakpoints, variable inspection)
- Use print statements for basic logging:
- Keep DevTools open to monitor performance
- Use Profile mode for performance testing:
flutter run --profile - Check CPU and memory usage in DevTools
Release Build Instructions
- Android Build
- iOS Build
Android Release Build - Complete Guide for Beginners
Step 1: Prerequisites Setup
Before starting, ensure you have:
- Latest Flutter SDK installed
- Android Studio installed
- Java Development Kit (JDK) installed
Step 2: Configure App Details
- Open your Flutter project
- Navigate to
android/app/build.gradle - Update these important values:
defaultConfig {
    applicationId "com.yourcompany.yourappname"  // Your unique app ID
    minSdkVersion 23    // Minimum Android version support
    targetSdkVersion 34 // Target Android version
    versionCode 1       // Increment this for each release
    versionName "1.0.0" // Your app version
}
Step 3: Create Keystore (One-time Setup)
- Open terminal/command prompt
- Generate keystore by running:
keytool -genkey -v -keystore android/app/upload-keystore.jks -keyalg RSA -keysize 2048 -validity 10000 -alias upload - Save your passwords safely!
Step 4: Configure Signing
- Create
key.propertiesinandroid/folder - Add these lines:
storePassword=your_keystore_password
keyPassword=your_key_password
keyAlias=upload
storeFile=upload-keystore.jks
Step 5: Update Gradle Config
Add this to android/app/build.gradle:
def keystoreProperties = new Properties()
def keystorePropertiesFile = rootProject.file('key.properties')
if (keystorePropertiesFile.exists()) {
    keystoreProperties.load(new FileInputStream(keystorePropertiesFile))
}

android {
    signingConfigs {
        release {
            keyAlias keystoreProperties['keyAlias']
            keyPassword keystoreProperties['keyPassword']
            storeFile file(keystoreProperties['storeFile'])
            storePassword keystoreProperties['storePassword']
        }
    }
}
Step 6: Build Release Version
For Play Store (App Bundle):
flutter clean              # Clean previous builds
flutter pub get           # Get dependencies
flutter build appbundle   # Create app bundle
Find at: build/app/outputs/bundle/release/app-release.aab
For Direct APK Installation:
flutter clean            # Clean previous builds
flutter pub get         # Get dependencies
flutter build apk       # Create APK
Find at: build/app/outputs/flutter-apk/app-release.apk
Important Tips
- Test release build:
flutter install - Keep keystore file safe
- Never share
key.propertiesor keystore - Test on multiple Android devices
- Start with internal testing on Play Console
- Verify app icon and splash screen
- Use internal testing track on Play Console first
- Back up your keystore file - it's required for future updates
- Test the release version thoroughly before publishing
iOS Release Build
-
Configure in Xcode:
- Open
ios/Runner.xcworkspace - Set bundle ID & signing ↗
- Update version/build number
- Open
-
Build Options:
For App Store/TestFlight:
flutter build ios --releaseThen in Xcode:
Product → Archive → Distribute AppFor IPA File (Enterprise/Ad-hoc):
# For Enterprise Distribution
flutter build ipa --export-method=enterprise

# For Ad-hoc Distribution
flutter build ipa --export-method=ad-hoc
IPA file location:
build/ios/ipa/App.ipa
- Enterprise requires Apple Enterprise Developer account
- Ad-hoc needs device UDIDs registered in developer portal
- TestFlight is recommended for beta testing
- Verify provisioning profile matches export method
Additional Resources
Official Documentation
- Flutter: Installation | Release Guide | Build Config
- Platform: Android | iOS | Maps
- Firebase: Setup | Messaging
Documentation links are regularly updated with latest best practices.